3.30.2012

~26~ Another Birthday, Another Year

Well folks, I am officially another year older! Yesterday I celebrated my 27th birthday and I must say, it was fantastic!  After work, I went to dinner with Jake and his family at Red Robin, had a very delicious (and free!) burger alongside a bottomless root beer float.  I also got some really nice gifts, with my favorite 2 being from Jake.

Wednesday after work, he surprised me with a tee-shirt from the show Big Bang Theory.  For those of you who haven't seen it, you really need to.  It is HILARIOUS!  To sum up of the meaning behind the shirt-one of the main characters is Sheldon, who is an OCD physicist living next door to the stereotypical blonde hottie, Penny, who moved to CA to become an actress, but ends up working as a waitress at the Cheesecake factory.  In one of the episodes, Sheldon gets sick and all of his friends avoid him because he's so whiny and needy when he gets sick.  Penny, doesn't know any better and gets roped into taking care of Sheldon, who requests that she sings him a song his mom used to sing him when he was sick as a child called, "Soft Kitty".


For my "real" present though, Jake got me the Cuttlebug I was wanting!!  I'm so excited to play around with it and see how it enhances my cards!  Be on the lookout for some upcoming posts, highlighting some projects with it. 
Now I know what some of you are thinking; what's a birthday without some cake?  Don't worry, there was definitely cake!  As you know, ever since I was little, I have loved baking-particularly cakes and pies.  Unlike most children, I never wanted my mom to make my cake-in fact I would get mad if she did-so every year, I bake and decorate my own cake.  This year, I made a yellow cake with white buttercream frosting.  Unfortunately, I'm not what some people would call a true baker because I use a boxed mix and don't bake it from scratch.  However, my real joy is in the decorating part.  While my cake isn't from scratch, my buttercream frosting is.  I use the Wilton recipe for making it:

1/2 cup butter
1/2 cup shortening (I use Crisco)
4 Cups of powdered confectioners sugar
2 Tbsp Milk
1 Tsp clear vanilla

Step 1: Cream the butter and shortening together
Step: 2: mix in the vanilla and milk
Step 3: Add in the powdered sugar, 1 cup at a time, blending thoroughly 

To assemble my cake, I use a bread knife to make sure each layer is flat so that they will line up flush.  I put a layer of frosting between them and then put a thin layer all around it to create a crumb coat, which seals in all of the crumbs so that when you fully frost the cake, you get a nice smooth and clean coat.  Just make sure that after your crumb coat, you let the frosting set.  I'm not totally happy with how the cake came out because I made a mistake on the side detail of the cake and had to start over, creating a not so smooth look, but in the end it tasted delicious! And that's all that really matters-right?

What's your favorite kind of cake?
Until next time, 


3.23.2012

~25~ Spring Break

I have been a very, very bad blogger.  I just realized that it's been over a week since I last did a post, and figured it's about time I wrote an update.  This week, I've been on spring break and even though it's been SO nice, not having to go to work everyday, I've still be very busy.  Last Saturday, I went home to Minneapolis to visit my parents, and a few of my friends that I don't get to see very often, and had so much fun!  The weather was just beautiful and it made me realize just how much I missed the lakes and my hometown city.

I got back to Des Moines, on Monday night, and have been spending my week house/dog sitting.  I had planned on doing some crafting during all of my free time, but this dog-sitting adventure has been a lot more time consuming than I had thought it would be.  Of course the best thing I did all week was an hour long, hot stone massage on Tuesday.  I was in pure heaven for those 60min and I only wish that I had the money to get one every weekend-or even every month.  For me, it truly is the best medicine.

I still have lots of projects on my plate that I'm hoping to get around to soon.  If not right away, for sure this summer.  Once we get back from spring break, there's only 9 week (44 days) of school.  Summer break is going to be here before you know-and I really can't wait! I'm hoping to really get my inventory and Etsy shop fully stocked during that time off.

Taken from www.scoutandnimble.com
My project list is as follows:

*Sheet music print of our 1st dance song, "Lucky".  Taken from another blogger, Scout&Nimble

*Make more cards and card boxes

*Create gift packaging sets-gift bags and tags

*Customized signs and home decor items.


I'll be sure to keep you all updated on them as I get to them.  Until next time, 


3.12.2012

~24~ Boxes Everywhere!

I hope everyone had a fabulous weekend!  Jake and I had the perfect amount of time split between hanging out just the 2 of us and with friends. Friday night, we went to dinner at a restaurant called "Bang, Bang" where you create your own meal from various meats, veggies, noodles, and sauce combinations and then watch the chefs cook it up on a huge stone grill.  It was very yummy.  Saturday, Jake went golfing with the guys, while I worked at the YMCA and then took my dog, Buckles for a walk since the weather was so beautiful.  Afterwards, we met up with some friends at a local restaurant and bar for some food, drinks, and karaoke-and had a great time!  Sunday, we watched stayed in, ordered take out, and watched an HBO movie called, "Game Change", which I highly recommend.

Aside from a great weekend, I've also gone a little crazy making card boxes.  I just love how they are turning out and am so, so excited to have a beautiful way to show off my cards.  It's also a great way to use some of my excess cardstock that has been laying around.  Who knew it could be so easy.  Here are some of my latest patterns.


As always, if you love anything you see enough that you've "gotta have it", you find any of these items listed on my ETSY site. 

Have a great week everyone! 
Until next time, 


3.05.2012

~23~ 5K Leukemia/Lymphoma Raffle Donation

This past weekend, I spent A LOT of time crafting.  A friend of mine, and fellow blogger asked me a couple of months ago if I'd be willing to donate some of my craft projects for a raffle she's organizing for the Leukemia and Lymphoma "Ready.set.cure" 5K race on April 14 in Pelham, Alabama.  I of course said yes, and agreed to make a contribution of a 5 card pack of homemade greeting cards. If you're interested in learning more about the event or how to contribute to the research of blood cancers, you can visit the official website HERE.

Prior to making my cards, I mapped out what type of cards I wanted to make and in which designs.  I came up with 2 birthday cards (1 female/1 male), 1 thank you, 1 congratulations, and 1 everyday card.  I figured that this distribution would provide a decent amount of variety for various life events.  The 1st card I made was a birthday card using the Celebrations Cricut cartridge, using the flower present design.  The background floral cardstock is from the Citrus Stack.


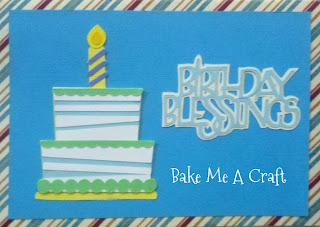
The second birthday card I wanted to make more guy friendly, so I used blues/greens for the color theme.  The cake is cut from the "Sweet Treats" cartridge and the phrase, 'birthday blessings' is from the "George and Basic Shapes" cartridge.  The background paper is from the Guy Stack.

For my thank you card, I again used "George and Basic Shapes" to create the flowers and then cut out skinny pieces of green paper to make the stems.  After I attached my stems to the flowers, I gathered them as if I were creating a real bouquet and tied them using white string that I normally use for cross-stitching.  The wording was done using the "All Mixed Up" cartridge.  The inside of the card says, 'a bunch'.  The background paper was also taken from the Citrus Stack.  To add a little extra something, I bling-ed out the center of each flower bud.

The congrats card was made using cardstock from the Glitter Stack that I just picked up this weekend.  The congrats decal was created using the "Lacy Labels" cartridge.  I stamped and embossed the word 'congrats' in the center with blue ink and clear embossing powder.

The last card in the pack was an any occasion card that I created using the "George and Basics Shapes" cartridge for the flowers, "Celebrations" cartridge for the scallop/circle.  I embellished the rest of the card with pink and black ribbon, and pearl button to finish the look.


Since I was excited to have figured out a great and attractive way for packaging my cards, I also made a pink polka dot card box to hold them, and included stamped dividers.


I hope that the winner of the raffle and these cards really enjoys them and is proud to give them to his/her friends & family!
If you're interested in having any of these cards or card box of your own,  they are available on my Etsy site

Have a great week everyone!


3.02.2012

~22~ Card Box


Photo taken from
http://craftyliu.wordpress.com/
Last night, after conferences, I came home and was in a mood to craft.  I've been thinking a lot about how I want to better market and package my cards so that people-anybody-might actually want to buy them.  I've been talking with my mom about how not many people want to buy just a single card, so the way that I have my Etsy shop set up right now, just doesn't make logistical sense.  A while back on Pinterest, I found this great looking card holder and pinned it as in inspiration for myself.  All along though, I was thinking I needed to buy the base and then cover it with pretty paper.  Do you know how impossible it is to find an 8" tall "magazine/paper holder", instead of the standard 11" size??  After discussing my frustrations with my wonderful husband, he suggested I just make one.  DUH!

I started by making a 1/2 size template to see how exactly everything should fit together and how big my cardstock needed to be to make this work.  I wanted my cards to stand up vertically and most of my cards are 5"x7", so I made the height of it 8", the width of it when put together 3", and the length of it 5 1/2".  When I measured out how long and wide my paper would have to be, it came out to 17" x 20".  That's a little big.  I then came up with the idea of cutting it out of 2 different pieces of paper and then fitting them together.  I mapped out one side of the box including the back the and front flap and then did then duplicated it on the other piece of paper for the right side.  I had enough scrap left over to create the bottom and front fold over flap-which was also done in 2 pieces. 

To make the card box, I measured the back panel at 1 1/2" and the side panel at 5 1/2" and the front flap also at 1 1/2".  Make sure to create a flap piece off of the of the 5 1/2" section to adhere to the base.  For the base, I created 2 strips.  One that had a 1" flap to attach to the back panel, and 5 1/2" for the length of the base.  Altogether, the strip is 6 1/2" long.  The other strip is to attach to the and creates the front flap.  this is divided into 3 sections, 3" to attach to the base, 3" for the front panel, and 1" to fold over the top as a flap for a total length of 7".   Before assembling I scored all of my folds on all of the lines using a bone folder.  


*To assemble the card holder*
Note: I used tape in these step-by-step directions; however, in the real thing, I used my ATG to make sure that all of the sides/pieces were well bonded together.                                                        Step1: Tape the two strips together.  Place the 3" end of the longer strip so that it over laps the 5 1/2" end of the other strip.  The end of the 1st 3" fold should line up with the end of the 5 1/2" section so that it is flush.                                              Step 2: Over lap 1 1/2" ends of the large side pieces so that they line up perfectly.  The 1" end from the long base piece should go between them.  From the end of the side pieces, the base piece should go 1", 5", 3", 3", 1"                                                         
Step 3: Pull in the tabs at the end of each side piece and pull the back spine up so that the flaps sit on top of the long base piece.  Adhere the tabs to the base.  Then pull in the end tabs (1 1/2" section) to the front and adhere them together.  Everything should line up flush-so that nothing is hanging off of the base piece.                
Step 4: Pull up the end piece from the front of the box and fold over the flaps you just taped together.  The 1" end piece should fold over the top and adhere to the inside. 

To decorate my box, I precut the patterned cardstock to the sizes that I wanted, leaving a 1/8" border around it and added them to the box template pieces before assembling the box.

The final product that I made last night is from the Citrus card stock, and measures 3" wide as opposed to the 1 1/2" I used in my how-to guide.  You can easily adjust the width of your box by changing the all of the 1 1/2" measurements to your desired width.  My 3" box will hold about 15 packaged cards. 


Now that I've figured out an easy way to make my boxes and customize each one with patterns and varying sizes, I've very excited to start mass producing them!  Look for posts to come highlighting my various designs. 

Have a great weekend!
Until next time, 


3.01.2012

~21~ My Favorite Things v.3.1

I know, it's not Wednesday.  With it being conference week at school, I've been a little busy getting ready for those, and didn't get a chance to get on and blog.  Tonight is the last night of conferences, and I am SO glad!

My favorite thing this week: March!  

Being that today is March 1st, I thought it very fitting to move My Favorite Things series back a day.  When I look at all of the months in the year and the events that are associated with each, I really can't think of a better month than March.  There are just too many good things happening, that no other month even comes close in comparison.

1) Spring Break.  I will be spending my spring break this year split between Minneapolis and relaxing here in IA.  Only 11 more working  days (but who's counting?)

2) Spring.  Of course Spring Break wouldn't be possible without the approaching of spring.  And while our winter here in IA has been very mild with a minimal amount of cold days and snow (knock on wood), I am more than ready and willing to embrace more warm weather, sunshine, and budding flowers/trees.

3) It's National Crafting Month.  This means lots of great sales all month long at JoAnns.  JoAnns+sale = one very happy Maggie.

4) Engagement Anniversary.  Jake and I got engaged on March 13, 2010.  While we may not celebrate this date as much now that we're married-I think of it very fondly and will always remember the day that he got down on one knee and asked me to be his wife.  I'll save that story for the next installment of "Blogger Behind the Screen".

5) My Birthday!  I had to save the best for last.  Yep, March 29th marks the anniversary of my day of birth, and puts me one step closer to the dreaded 3-0.  Birthdays are always fun though and I am more than excited to celebrate this year.  I've been sending out some email hints to Jake-and I'm hoping this year to get a CuttleBug.  I'm still not sure exactly what it does and how it works-other than that it embosses paper, but stay tuned, because there will definitely be some posts about it in the near future.  (That is of course, if I get one…)


What do you love about March?


Related Posts Plugin for WordPress, Blogger...